You can build an aging-in-place bathroom that stays stylish by choosing universal upgrades that blend in, like single-lever or touchless faucets, comfort-height toilets, and thermostatic mixing that caps hot water near 120°F. Plan grab bars around real tasks and mount them 33–36 inches AFF with decorative covers so they don’t look clinical. Go curbless with a low-threshold or wet-room layout, slip-resistant matte finishes, and adjustable showerheads. Layer glare-reducing lighting plus smart mats near key areas, and match finishes for a seamless look—keep going to learn more.
Pick Universal Design Upgrades That Blend In
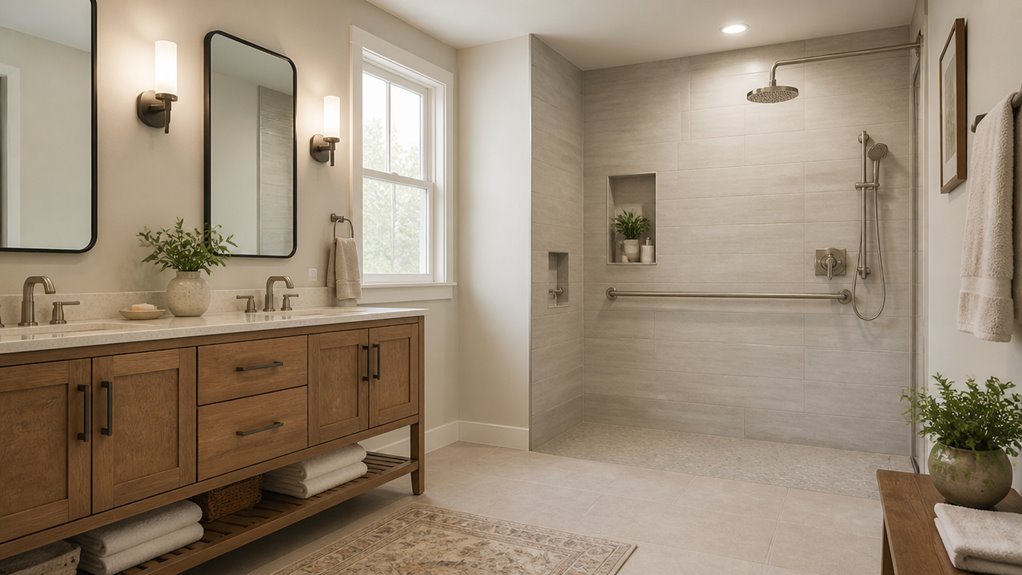
When you plan for aging-in-place, you want universal design upgrades that improve safety and independence without making the bathroom look like a hospital.
Start with seamless accessible fixtures that fit your everyday style. Replace dual-knob faucets with single-lever or touchless models so limited dexterity doesn’t slow you down, and choose thermostatic mixing valves to cap water near 120°F (49°C) for scald prevention.
Upgrade with single-lever or touchless faucets and thermostatic valves to cap water around 120°F, helping you move safely—no hospital look.
Install comfort-height toilets at about 17–19 inches to ease transfers, and use curbless, linear drains with gently sloped shower floors so roll-in access works without breaking visual continuity.
Finish with matte or satin neutral tones, like brushed nickel or oil-rubbed bronze, to support aesthetic harmony while hiding wear and fingerprints.
This design approach aligns with the showroom’s comprehensive bathroom solutions, which emphasize a fully integrated design-and-build process, predictable costs, and coastal-living considerations for moisture and light. in-house project management ensures clear communication and a final walkthrough for client confidence.
Plan Grab Bar Placement Without Visual Clutter
Thoughtful grab bar placement helps you keep safety while preserving your bathroom’s style. Integrating the grab bars into existing bathroom elements reduces visual clutter, and planning around the task-based locations supports a smoother remodel timeline. This approach aligns with the planning steps that connect practical build plans with aesthetic details, ensuring the final design remains cohesive planning steps.
Choose Curbless Shower Layouts for Safer Entry
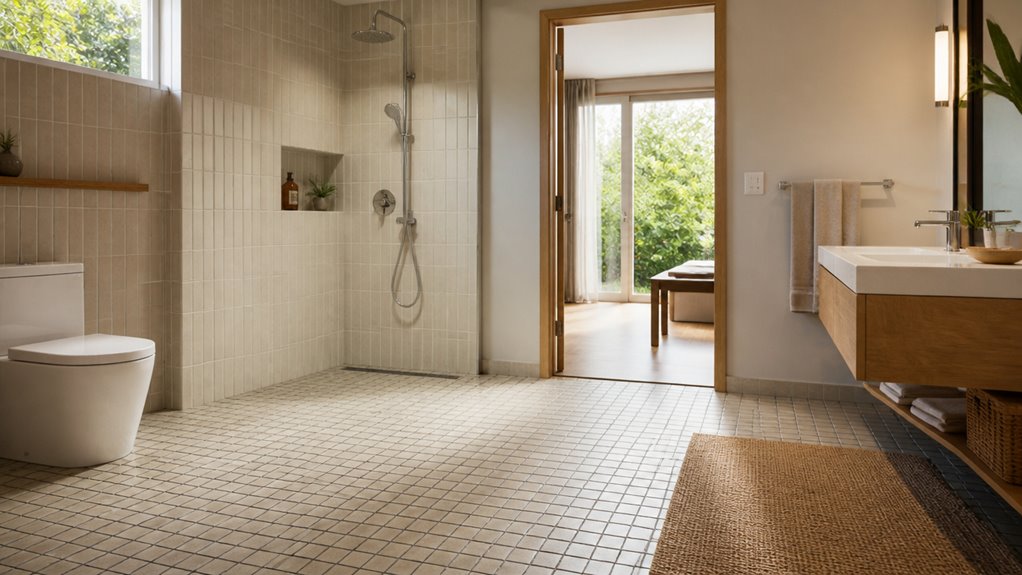
Choosing a curbless shower layout can make getting in and out safer, because you remove the step that often causes trips and balance problems.
You’ll still choose between wet-room style floors, pitched-floor curbless entries, and low-threshold or partial-curb options that guide water without a big height change.
For many homeowners, preformed curbless bases simplify drainage solutions by integrating slope and a drain in one unit.
If you prefer a fully open look, use extensive waterproofing plus a linear drain, so you can keep a clear single-direction slope across the tile.
Center drains require careful multi-plane waterproofing instead.
Pick slip-resistant, matte finishes, and aim for about 1/4″ per foot slope toward the drain to prevent pooling. coastal moisture
Install Adjustable Fixtures for Easier Daily Use
To make daily bathing and grooming easier as your needs change, you should install adjustable fixtures that reduce awkward reaching, constant re-positioning, and temperature guesswork.
Start with showerhead flexibility: fit a height-adjustable slide bar and a handheld on a 5–6 foot hose, so you can rinse while seated or standing. Choose multi-function spray patterns and thermostatic or pressure-balancing valves to maintain consistent water temperature, improving user comfort and safety.
Upgrade faucet accessibility with single-lever, pull-out models and lever or D-shaped handles for grip enhancement. Add adjustable aerators for water conservation without sacrificing performance.
For vanity height, use wall-hung or height-adjustable options, typically 28–36 inches, to support seated and standing routines with ergonomic design.
Consider touchless technology for hands-free operation, while planning for sensor maintenance. waterproofing quality and proper drain planning also influence long-term reliability as you adapt spaces for aging-in-place.
Add Built-In Seating That Doesn’t Look Clinical

When you build seating into the shower, you keep it present but subtle, using alcove benches or recessed niches with a comfortable 15–18 inch depth. Add built-in seating that complements the overall bathroom design while aligning with user-friendly features like proper faucet and outlet coordination, and choose finishes that blend with the vanity and storage elements for a cohesive look. recessed storage
Bench Integrated Into Shower
A bench integrated into your shower can make aging in place feel more comfortable and less medical, especially when you treat it like an architectural feature rather than an add-on.
Focus first on design aesthetics: run continuous materials so the bench and shower walls share the same tile, and soften profiles with rounded edges or chamfered corners.
For material selection, choose warm, low-porosity surfaces like honed stone or wood-look porcelain, with matte texture for wet traction (about ≥0.42 DCOF).
Set seat height at 17–19 inches and depth near 15–18 inches, plus keep at least 30 inches of clear space for safe transfers.
Add a gentle 1–2% slope to the drain, and embed grab bars and niche lines so everything stays seamless.
Fold-Down Teak Or Glass
After you’ve integrated a shower bench as part of the room’s tile story, you can keep the same “built-in” feel by choosing a fold-down seat that looks like clean bath design instead of a medical add-on.
Pick teak for teak aesthetics: naturally oily, rot-resistant, and ideal in wet rooms. Use teak slats with anti-slip texture so the surface stays stable when it’s wet.
Mount it with stainless 316 marine hardware, and anchor through wall studs or reinforced plates so the mechanism supports 300–400 lb.
If you prefer a brighter, modern look, go with frosted or laminated glass durability, since it resists shattering and holds fragments if broken.
Add hydrophobic or anti-fingerprint coatings, and you’ll clean less often.
Hidden Safety Grab Support
To keep aging-in-place bathrooms looking like comfortable living space instead of a medical setup, you can hide safety grab supports inside the design rather than mounting them openly.
Choose hidden grab bars that sit flush in cabinetry, behind removable trim, or within the tub deck, so the bathroom still looks like furniture. Make sure each bar is backed by concealed reinforcements, such as 2x blocking or steel plates, so the wall can handle the needed 250–500 lb load.
You can also use recessed, finish-matching bars at ADA support heights of 33–36 inches. For extra help without visual bulk, add pull-out or swing-out arms that fold into wall cavities.
Combine this with a built-in bench for steady, everyday transfers.
Use Non-Slip Flooring and Smart Mat Strategy
When you design an aging-in-place bathroom, non-slip flooring and a smart mat strategy work together to protect you from the most common hazards—slips and falls—without forcing you to give up independence.
Choose non-slip materials with textured surfaces and water-resistant performance, aiming for a wet COF of at least 0.42. Look for options like embossed LVP, honed or textured porcelain, or rubber, since they keep traction when the floor gets wet.
Next, place smart technology mats near the toilet, shower, tub, and bedside. These pressure-sensitive mats detect presence and abnormal patterns, then send alerts to your phone or caregivers.
Use adjustable sensitivity and zoning to reduce false alarms, and plan for backup notifications if Wi‑Fi drops.
Layer Bathroom Lighting to Prevent Nighttime Falls
To prevent nighttime falls, you should layer bathroom lighting so it supports you without glare or sudden brightness changes.
Use low-glare ambient light for general visibility, task lighting at the vanity or shower for clear seeing, and subtle accent cues plus a warm night light along the path from bed to bathroom.
Add motion-activated, warm-colored night lights so you don’t have to fumble for switches when you’re half-asleep.
Layer Ambient Task Night Lighting
A smart layering approach to bathroom lighting helps you move safely at night by reducing harsh shadows and keeping you oriented as you navigate.
Start with even ambient light, aimed around 100–200 lux, so floors and step edges keep clear contrast, with luminance ratios near 3:1.
Next, add task lighting at the sink or mirror. Use hooded, dimmable fixtures so you can set 15–50 lux for grooming without blasting the room.
For night safety, choose warmer 2200–3000 K for the night layer, and use dimmer scenes from night to daytime.
Finally, practice glare reduction with indirect, diffused light and shielded fixtures below 200 cd/m² at eye level.
Use Low-Glare Motion Night Lights
Low-glare motion night lights help you move through the bathroom at night without fighting harsh shadows or sudden bright flashes.
Start by choosing low glare fixtures with frosted or opal diffusers, integrated shielding, and warm 2700–3000K LEDs. Use LEDs with CRI 80+ so colors stay natural even at low output, aiming for dimming capability down to about 5 lux at floor level.
Next, install motion sensors with PIR or low-energy radar, calibrated for small movement about 0.5–2 m away. Program short fade-up and longer fade-down times, like 10–30 seconds up and 2–5 minutes dim-down, so light doesn’t startle you.
Place lights by the toilet, bathtub edge, and door thresholds, while avoiding reflected glare from mirrors.
Match Finishes, Colors, and Hardware for a Seamless Look
When you match finishes, colors, and hardware, your bathroom stops looking like a collection of separate parts and starts feeling like one well-planned room.
Build color consistency by choosing a 2–3 tone palette with durable, low-VOC paint, then repeat mid-tone neutrals and coordinated accents across towels and accessories.
Next, lock in finish matching: standardize brushed nickel or PVD across faucets, grab bars, and towel bars, and test samples under your actual bathroom lighting to avoid tone surprises.
Finally, improve fixture alignment by using consistent shapes and edge details, and plan material selection for warmth.
Focus on texture layering with matte porcelain or honed stone, so every upgrade feels intentional.
- Unified palette for less visual clutter
- Hardware harmony across all metal touchpoints
- Cohesive fixture lines and grout hues
Budget and Retrofit With Proof-Ready Safety Upgrades
To keep the bathroom looking cohesive while you make it safer, treat budget planning like part of the design process, not an afterthought.
Start with code-forward safety upgrades, because inspectors care about proof. You’ll want grab bars placed 33–36 inches AFF with documented blocking or retrofit anchors rated for heavy point loads, plus the right toilet seat height (about 18 inches) and clear transfer space.
Next, use budget friendly solutions that still support universal access, like corner reinforcement kits, low-profile shower curbs, and tub-to-shower conversion pans that fit existing footprints.
Prioritize lighting and GFCI outlets within 6 feet of water, and choose slip-resistant floors using COF targets or manufacturer certification.
Finally, pick aesthetic enhancements such as decorative grab bar covers, lever faucets, and matte tile coatings.
Wrapping It Up
When you age in place, your bathroom should feel like home, not a hospital. By blending universal design upgrades, you keep grab bars, curbless entries, and seating discreet yet effective. Adjustable fixtures and smart lighting help you move with confidence, even after dark. Non-slip flooring and careful mat choices add traction without tripping the eye. Match finishes, colors, and hardware for harmony. Retrofit with proof-ready safety, and you’ll protect today’s comfort while preparing for tomorrow.